
Standard 1.5" Diameter Self-Watering Buildable Moss Pole Reservoir w/ Adjustable Drip Flow for Sphagnum Moss & Hydration
Quantity


Designed & Crafted in the USA

Built To Grow With Your Plant

Bio-sourced, Renewable Materials

Made With Intention
Smarter, Self-Watering Support for Thriving Plants!
Keep Your Moss Pole Hydrated to Keep Your Climbing Plants Thriving!
🌿 Works with all of our Standard 1.5 in Diameter-Sized Buildable Moss Pole Starter Sets and System Parts—Sold Separately!
🚫 Not Compatible with Giant 2 in Diameter-Sized Moss Poles.
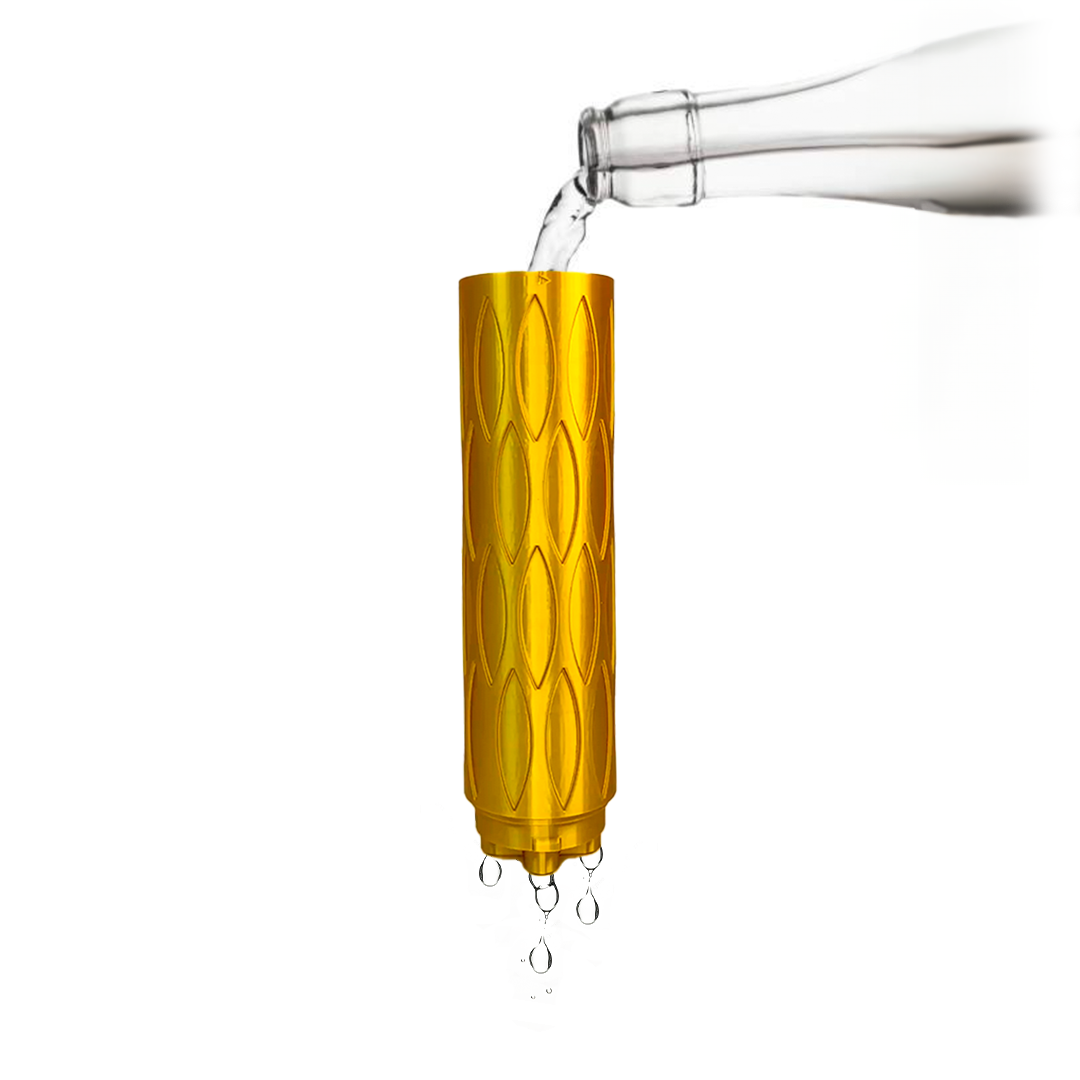
Give your climbing plants the hydration and support they need to grow stronger and healthier with the Standard 1.5 in Diameter Self-Watering Buildable Moss Pole Reservoir—a modular plant hydration system designed to keep your moss pole moist and ideal for sphagnum moss setups.
Perfect for Monstera, Philodendron, Pothos, and other vining plants, this self-watering moss pole ensures steady moisture absorption, promotes strong aerial root development, and reduces watering frequency. Whether you're starting small or building a lush vertical garden, this expandable plant support system grows with your plant, ensuring optimal hydration and stability at every stage..
🌿 Includes:
✔ 1x Standard 1.5 in Diameter Self-Watering Buildable Moss Pole Reservoir (4.5 inches / 6.5 cm tall) (Holds 65g (2.3 oz) of water, allowing you to regulate moisture levels without frequent watering)
✔ 1x Adjustable 4-Prong Drip Head (Twist to regulate water flow for optimal plant hydration)
Measuring 4.5 inches (6.5 cm) tall, this system features modular components and an adjustable drip head, allowing you to customize water flow and expand your plant support as needed
💡 Want to expand your moss pole? Additional parts are available to build taller support as your plant grows!
🌿 Key Features & Benefits
✅ Modular & Expandable Plant Support – Replace or add pole sections without disturbing root growth, so your plant’s support system evolves with it.
✅ Adjustable Water Flow for Healthier Roots – The bottom 4-prong drip head twists to control hydration levels, preventing overwatering and keeping sphagnum moss evenly moist.
✅ Self-Watering Reservoir for Effortless Plant Care – Holds 65g (2.3 oz) of water, slowly releasing moisture to keep climbing plants hydrated longer with less frequent watering.
✅ Easy Assembly & Customization – Designed for quick attachment of modular parts, allowing effortless height adjustments as plants grow.
✅ Compatible with a Variety of Substrates – Designed to hydrate different growing mediums, helping support strong aerial roots while keeping your plants steadily nourished.
✅ Eco-Friendly & Safe for Pets & Plants – Made in the USA from sustainable, biodegradable PLA, free from harmful chemicals—safe for both indoor gardening and homes with pets.
✅ Long-Lasting & Durable Design – Built for indoor and outdoor use, ensuring years of stable plant support in any environment.
✅ 3D-Printed for Unique Craftsmanship – Due to the natural 3D-printing process, each moss pole has subtle, unique imperfections, blending seamlessly into your plant setup.
🌿 Smarter, Self-Watering Support for Thriving Plants!
Whether you're starting your indoor garden or expanding your collection of climbing plants, the Standard 1.5 in Diameter Self-Watering Buildable Moss Pole Reservoir provides customizable, self-watering hydration to help your plants flourish. 🌿💧
💡 Perfect for Monstera, Pothos, Philodendron, and more!

Step 1: Line Up the Pieces
Choose the pieces you want to connect based on your desired pole height. This may include body segments, the bottom spike, or the top cap. Each piece uses three nubs that align with three matching twist lock notches.
Actions
• Identify the parts you want to connect
• Align the three nubs with the three notches
• Confirm each nub is lined up before pressing together
Tip
If pieces do not slide together easily, recheck alignment. Do not force them.
Step 2: Insert the Leafy Support Ring
Place a leafy support ring between the two aligned pieces. This ring adds stability and rotates so the supports can gently guide climbing stems.
Actions
• Pick up the support ring
• Place it between the two pole sections
• Make sure it sits flat and centered
Step 3: Connect and Twist to Lock
With the ring in place, press the pieces together and twist to lock.
Actions
• Press the pieces together with the ring between them
• Twist to the right to lock
• Twist to the left to unlock if you need to adjust
Important:
There is no clicking or snapping sound when the pieces lock. A smooth twist with resistance means the connection is secure.
Tip:
Always twist using the solid top and bottom connection collars. Do not squeeze the middle body of the pole while twisting.
Step 4: Fill with Substrate and Stake in the Pot
Once assembled, fill the pole with your preferred substrate and anchor it into the pot near the plant base.
Actions
• Fill the pole with moss or your chosen substrate
• Lightly pack so it holds shape while allowing airflow
• Note that filling the pole also adds strength and stability to the overall structure
• Push the spike deep into the soil close to the plant base
• Firm the soil around the base with your fingers
• Water the soil and the pole after installing
Important
If the pole leans, it usually means the spike is not deep enough or the soil is too loose. Push the pole deeper and firm the soil more tightly around the base. We also offer an Anchor Base for added stability, especially helpful for larger plants or heavier top growth.
Step 5: Guide Your Plant Gradually
Moss poles are designed to support and guide upward growth over time, not to force heavy stems into position.
Actions
• Use the leafy supports to gently guide stems toward the pole
• Adjust supports slowly over several days or weeks
• Do not pull thick stems sideways toward the pole
Important
Although the built in supports help guide climbing growth, mature plants that need to be retrained often benefit from additional soft plant ties. This provides extra security while the plant adjusts.
Avoid bending the moss pole to reposition your plant. The pole is designed to remain straight for strength and structure. Bending or flexing can weaken the material and may cause breakage.
Tip:
If your plant is already leaning strongly to one side, guide it gradually rather than trying to correct everything at once.
Step 6: Add More Sections as Your Plant Grows
You can expand your moss pole anytime by repeating the same process.
Actions
• Align the new piece with the top of the pole
• Insert a support ring
• Press and twist to lock
• Repeat until you reach your desired height
Congratulations! You've successfully assembled your 3D-printed moss pole.This sturdy and supportive structure is now ready to help your plants thrive, providing an ideal environment for them to climb and grow.
------------------------------------------
For Larger or Heavier Plants
For mature monsteras or thick stems, we recommend using the Giant pole size. It is designed for heavier growth and provides stronger long term support.
Important Care Note
Parts are designed to align, press gently, and twist to lock in place. Too much force, bending, squeezing, or over twisting can cause cracks or damage. If a section feels stuck or something does not feel right, stop and recheck alignment.
For more detailed tips and care guidance, see our full guide here:
https://leafycove.com/blogs/lush-hour/guide-to-3d-printed-moss-poles
Questions? You can always reach us at:
care@leafycove.com
Enjoy free carbon neutral shipping on orders $35+, with premium and international shipping options available at checkout.
If you need your order sooner, please reach out to us at care@leafycove.com and we will do our best to accommodate your timeline.
Every piece is thoughtfully made to order in our Oakland, California studio using sustainable materials and small batch production methods. Your item is created specifically for you, not pulled from a warehouse shelf.
Production typically takes 5 to 7 business days (1-2 weeks) for most orders. Orders placed after 3:00 PM Pacific Time begin processing the next business day. Weekends, holidays, and studio closure days do not count toward production timelines.
Orders ship once all items in your order are complete. Shipping transit time begins after your order has finished production and is handed off to the carrier. Delivery estimates provided by carriers are for reference and are not guaranteed.
For full shipping details, please review our full shipping policy:
https://leafycove.com/pages/shipping-policy
Questions? You can always reach us at:
care@leafycove.com
Compare Products
| Price |
|---|
| SKU |
| Rating |
| Discount |
| Vendor |
| Tags |
| Weight |
| Stock |
| Short Description |
Compare Products
Need help
- Heading
- Heading
Description here