-
Shop
- Original Buildable Moss Pole System For Small to Medium Plants
- Giant Buildable Moss Pole System For Medium and Large Plants
- Propagation / Stem Vases
- Planters
- Planter Trays & Stands
- Trellises, Plant Stakes & Labels
- Watering Bells, Soil Scoops, And Tools
- Grow Light & Hydroponic Accessories
- Plant Soil, Plant Food & Plant Cleaning
5-Pack Original Leafy Stem Support Hooks
Quantity
This Is No Ordinary Modular Moss Pole System!
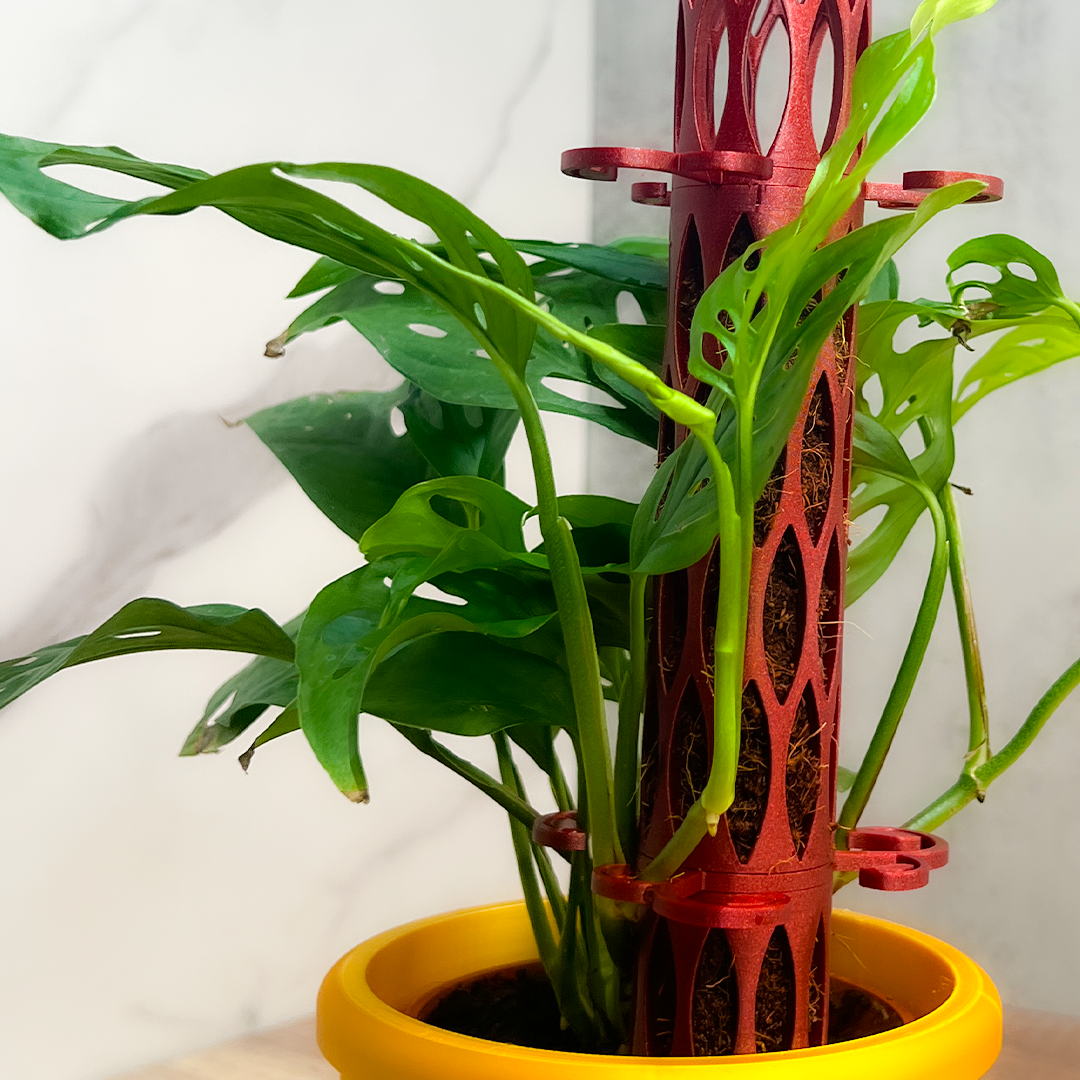
Our 2 Shorter Buildable Moss Pole Parts with Leafy Stem Support Hooks seamlessly integrate with all of our buildable moss pole sets and system parts. Part of our Expandable Modular Moss Pole System, these shorter poles parts are perfect for smaller plants or creating a customized height. Whether you started with one of our prebuilt systems or are constructing your personalized buildable moss pole, this innovative plant support system is engineered to meet all your climbing plant needs.

Includes:
- 5-Pack Leafy Stem Support Hooks: Each hook measures 3 inches (7.5 cm) and is crafted to securely hold your plant stems close to the moss pole. These hooks are perfect for training your plants to climb and grow vertically, promoting better airflow and light exposure, which are crucial for healthy growth. The hooks are easy to attach in-between Buildable body parts and adjust, offering a flexible solution for managing your plant's upward growth.
Works with all of our Buildable Moss Pole Starter Sets and System Parts—Sold Separately!
🌿 Add-On / Build Your Own Parts: As your plants grow, you can easily increase the height of your moss pole. Customize your moss pole system further by adding on to any starter set or building your own set. (Sold separately.)
🌿 Modular Design: Allows you to replace or adjust moss pole parts without disturbing the overall aerial root growth of the plant.
🌿 Twist-Lock Mechanism: Each body, top cap, and soil spike easily twist-lock together, providing a secure feeling and allowing you to effortlessly add parts as your plants grow.
🌿 Versatile Substrate Compatibility: The Modular Moss Pole System is designed to hold a wide range of substrates, ensuring that your plants receive the optimal support and moisture they need to thrive.
🌿 Leafy Stem Supports: Our unique 3-inch (7.5 cm) leafy stem supports are engineered to gently hold onto the stems of your climbing plants, keeping them close to the pole. These supports eliminate the need for strings or other fasteners, protecting the natural flow and integrity of your plants.
🌿 Eco-Friendly Construction: Crafted in the USA from sustainable materials such as PLA, our moss poles minimize environmental impact while ensuring durability and performance. Embrace eco-conscious indoor and outdoor gardening practices with our environmentally friendly designs.
🌿 🐱 Pet-Safe Decor: Rest assured knowing our plant stakes are free from harmful chemicals and toxins, making them safe for your beloved pets. Create a worry-free indoor garden environment that both you and your furry companions can enjoy.
🌿 Long-lasting Durability: Built to withstand the elements, our moss poles are designed for long-term use in your home and outdoor garden. With sturdy construction, they provide reliable support for your plants and decorations, promising years of vibrant indoor displays.
🌿 3D Printed Charm: Please be aware that as a result of the natural process of 3D printing, you may notice subtle imperfections or individuality in the final products. These quirks lend a charming, organic essence to your indoor garden, seamlessly blending with the beauty of nature's imperfections.
Transform your plant care routine with this Modular Moss Pole System. Give your climbing plants the support they deserve, and watch them flourish like never before!
A Step-by-Step Guide to Assembling a 3D-Printed Modular Moss Pole System
Step 1: Line Up Pieces
Begin by aligning the pieces you want to connect. This could involve different parts of the moss pole such as the main body segments, the bottom spike, or the top cap. Each piece has 3 nubs that fit into corresponding twist lock ports on the other piece. Ensure these nubs are positioned directly in line with the ports.
Actions:
- Identify: Identify the parts you need to assemble based on the desired height for your plant.
- Align: Match the 3 nubs on one piece with the 3 ports on the other piece.
- Position: Ensure each nub is lined up with its corresponding port.

leafycove.com
Step 2: Insert Leafy Support Spacer
Once the pieces are aligned, place a leafy support spacer between them. This spacer ring helps provide stability for the moss pole and also spins so its leafy support stems hold onto any large stems to support and hold any plants that will climb the pole.
Actions:
- Grab: Secure the leafy support spacer.
- Place: Position it between the two aligned pole pieces, opting to rest it on either the bottom portion of the moss pole's body piece or above the nubs on the top cap's bottom piece for easier placement.
- Ensure: Verify that it sits evenly to ensure consistent and reliable support.

leafycove.com
Step 3: Connect and Twist to Lock
With the spacer in place and the pieces aligned, connect them by fitting together and twisting. Twisting to the right will lock the pieces and spacer securely; twisting to the left will unlock them if adjustments are needed.
Actions:
- Fit: Firmly press parts together while matching the 3 nubs with the 3 ports on the other piecetogether with the spacer in between.
- Twist: Turn the top piece to the right to lock it (right is tight).
- Adjust: If needed, twist to the left to unlock (left is loose).

leafycove.com
Step 4: Fill Moss Pole with Substrate and Stake in Pot
After connecting and locking the pieces, fill the moss pole with the substrate that best suits your plant and stake it in the pot.
Actions:
- Fill: Carefully pour and gently pack the chosen substrate into the open end of the moss pole until it's filled.
- Stake: Secure the filled moss pole in the pot, adjusting positioning as needed.
- Adjust Leafy Stem Supports: Once staked, position supports to hold stems close, promoting rooting, stability, and growth.
- Water the Substrate: After staking the moss pole, water the substrate thoroughly to ensure proper moisture levels for your plant.

leafycove.com
Step 5: Repeat for Additional Pieces
Repeat the previous steps to add more pieces to the moss pole until you reach the desired height or as your plant grows. Each additional piece will require alignment, insertion of a support spacer, and twisting to lock in place.
Actions:
- Gather: Collect the next piece to be added.
- Align: Match the nubs and ports as before.
- Insert: Place another leafy support spacer between the new piece and the assembled pole.
- Connect: Press and twist to lock the new piece in place.
- Continue: Repeat until your moss pole is at the desired height.

leafycove.com
Congratulations! You've successfully assembled your 3D-printed moss pole. This sturdy and supportive structure is now ready to help your plants thrive, providing an ideal environment for them to climb and grow.
Ensuring your substrates stay moist is key to a thriving moss pole. To lend a hand with this, just unlock the top cap of our moss pole and give the substrate a drink whenever it's thirsty. We'll dive into this in more detail in the next section.
Compare Products
| Price |
|---|
| SKU |
| Rating |
| Discount |
| Vendor |
| Tags |
| Weight |
| Stock |
| Short Description |
Compare Products
Need help
- Heading
- Heading
Description here


